pico-ducky
Make a cheap but powerful USB Rubber Ducky with a Raspberry Pi Pico
## Install
Install and have your USB Rubber Ducky working in less than 5 minutes.
1. Download [CircuitPython for the Raspberry Pi Pico](https://circuitpython.org/board/raspberry_pi_pico/). *Updated to 7.0.0
2. Plug the device into a USB port while holding the boot button. It will show up as a removable media device named `RPI-RP2`.
3. Copy the downloaded `.uf2` file to the root of the Pico (`RPI-RP2`). The device will reboot and after a second or so, it will reconnect as `CIRCUITPY`.
4. Download `adafruit-circuitpython-bundle-7.x-mpy-YYYYMMDD.zip` [here](https://github.com/adafruit/Adafruit_CircuitPython_Bundle/releases/latest) and extract it outside the device.
5. Navigate to `lib` in the recently extracted folder and copy `adafruit_hid` to the `lib` folder in your Raspberry Pi Pico.
6. Click [here](https://raw.githubusercontent.com/dbisu/pico-ducky/main/duckyinpython.py), press CTRL + S and save the file as `code.py` in the root of the Raspberry Pi Pico, overwriting the previous file.
7. Find a script [here](https://github.com/hak5darren/USB-Rubber-Ducky/wiki/Payloads) or [create your own one using Ducky Script](https://github.com/hak5darren/USB-Rubber-Ducky/wiki/Duckyscript) and save it as `payload.dd` in the Pico.
8. Be careful, if your device isn't in [setup mode](#setup-mode), the device will reboot and after half a second, the script will run.
### Setup mode
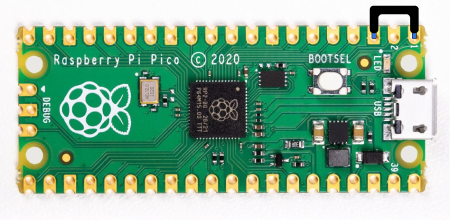
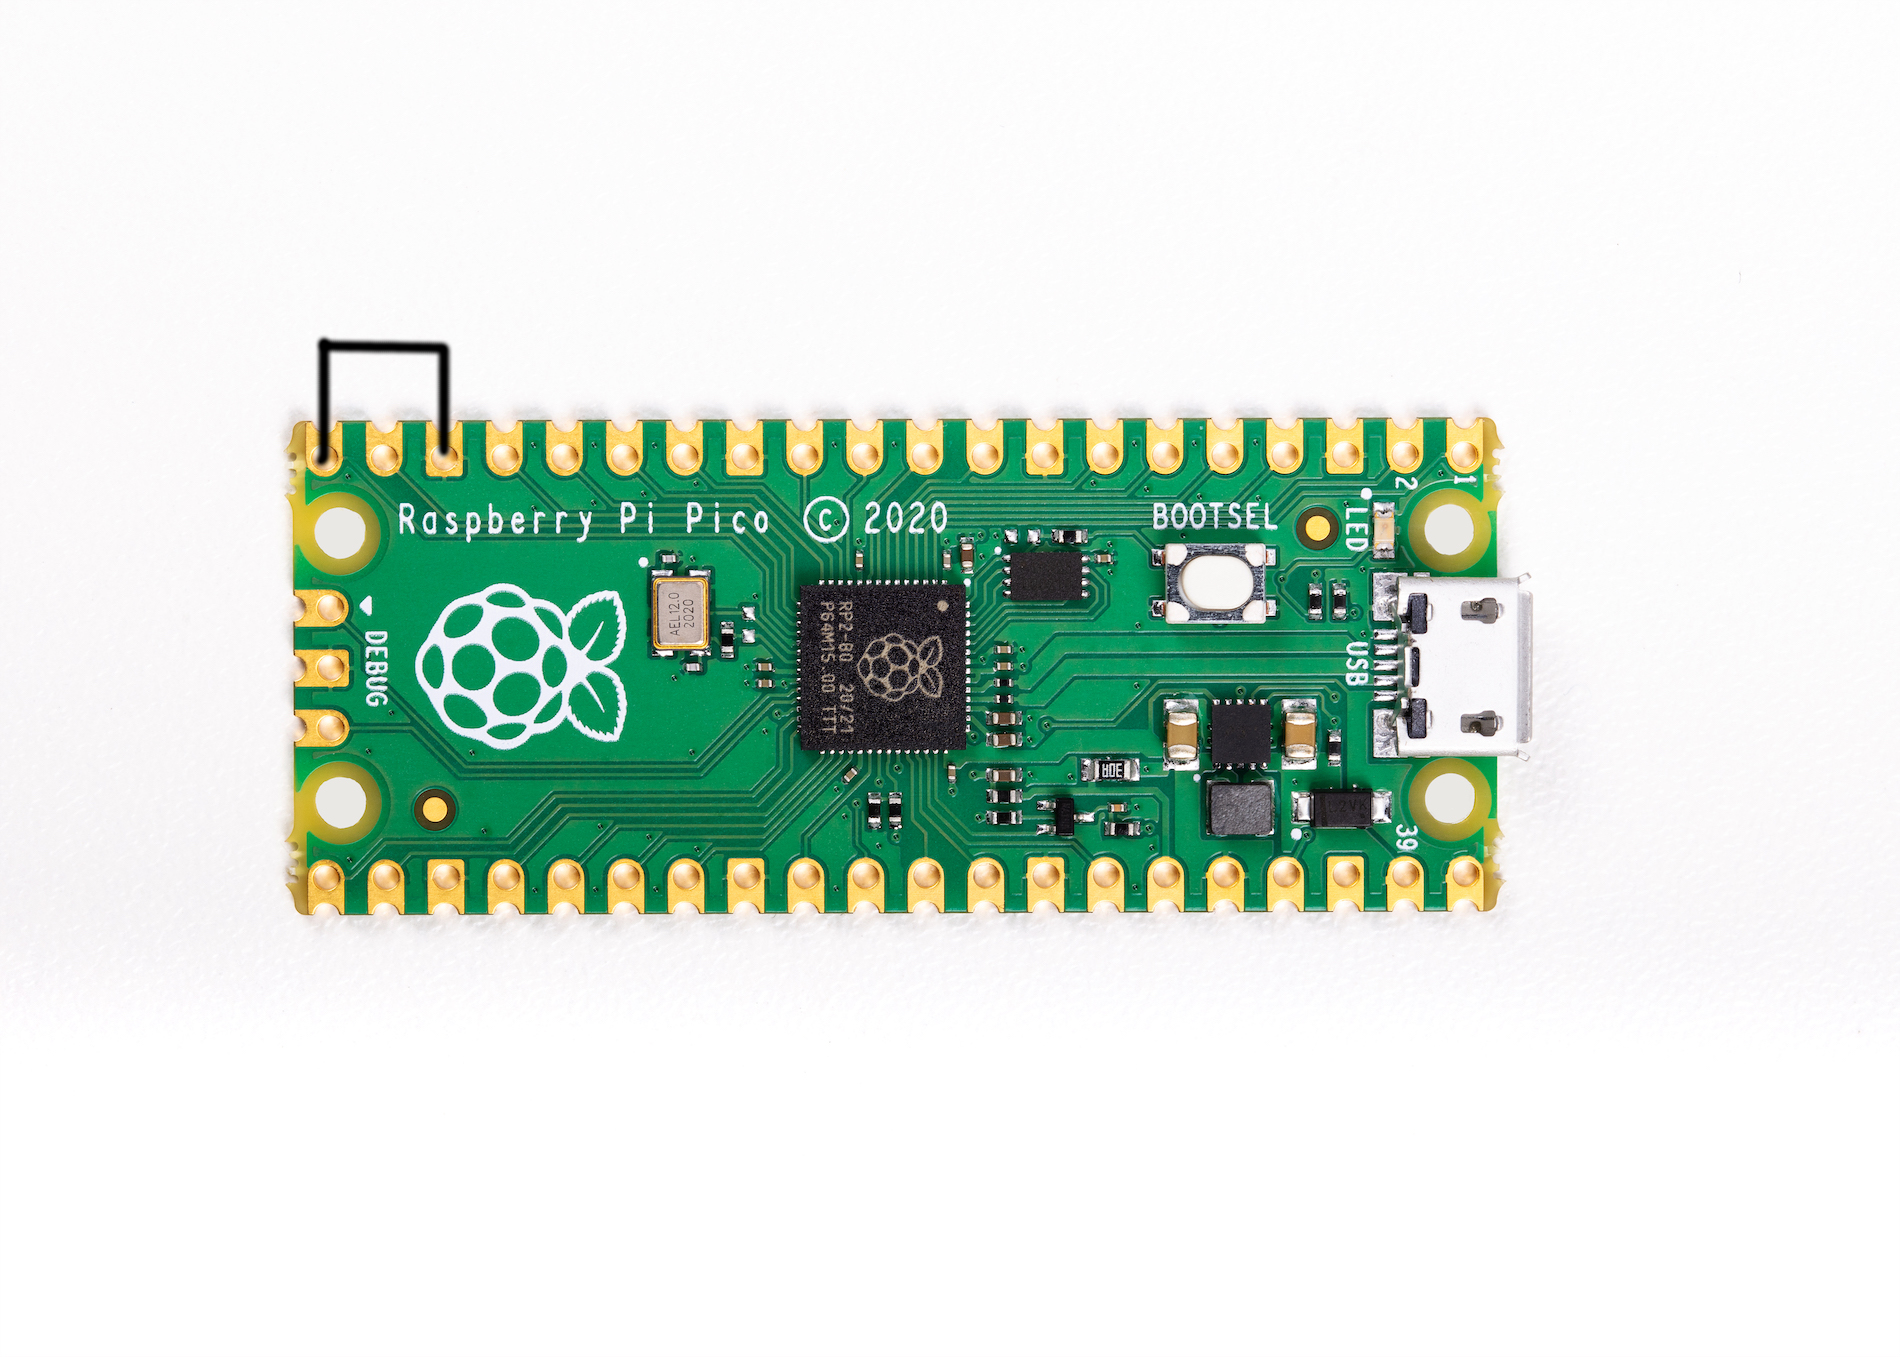
To edit the payload, enter setup mode by connecting the pin 1 (`GP0`) to pin 3 (`GND`), this will stop the pico-ducky from injecting the payload in your own machine.
The easiest way to so is by using a jumper wire between those pins as seen bellow.
### USB enable/disable mode
If you need the pico-ducky to not show up as a USB mass storage device for stealth, follow these instructions.
Enter setup mode.
Copy boot.py to the root of the pico-ducky.
Copy your payload script to the pico-ducky.
Disconnect the pico from your host PC.
Connect a jumper wire between pin 18 (`GND`) and pin 20 (`GPIO15`).
This will prevent the pico-ducky from showing up as a USB drive when plugged into the target computer.
Remove the jumper and reconnect to your PC to reprogram.
The default mode is USB mass storage enabled.
### Changing Keyboard Layouts
Copied from [Neradoc/Circuitpython_Keyboard_Layouts](https://github.com/Neradoc/Circuitpython_Keyboard_Layouts/blob/main/PICODUCKY.md)
#### How to use one of these layouts with the pico-ducky repository.
**Go to the [latest release page](https://github.com/Neradoc/Circuitpython_Keyboard_Layouts/releases/latest), look if your language is in the list.**
#### If your language/layout is in the bundle
Download the `py` zip, named `circuitpython-keyboard-layouts-py-XXXXXXXX.zip`
**NOTE: You can use the mpy version targetting the version of Circuitpython that is on the device, but on Raspberry Pi Pico you don't need it - they only reduce file size and memory use on load, which the pico has plenty of.**
#### If your language/layout is not in the bundle
Try the online generator, it should get you a zip file with the bundles for yout language
https://www.neradoc.me/layouts/
#### Now you have a zip file
#### Find your language/layout in the lib directory
For a language `LANG`, copy the following files from the zip's `lib` folder to the `lib` directory of the board.
**DO NOT** modify the adafruit_hid directory. Your files go directly in `lib`.
**DO NOT** change the names or extensions of the files. Just pick the right ones.
Replace `LANG` with the letters for your language of choice.
- `keyboard_layout_win_LANG.py`
- `keycode_win_LANG.py`
Don't forget to get [the adafruit_hid library](https://github.com/adafruit/Adafruit_CircuitPython_HID/releases/latest).
This is what it should look like **if your language is French for example**.

#### Modify the pico-ducky code to use your language file:
At the start of the file comment out these lines:
```py
from adafruit_hid.keyboard_layout_us import KeyboardLayoutUS as KeyboardLayout
from adafruit_hid.keycode import Keycode
```
Uncomment these lines:
*Replace `LANG` with the letters for your language of choice. The name must match the file (without the py or mpy extension).*
```py
from keyboard_layout_win_LANG import KeyboardLayout
from keycode_win_LANG import Keycode
```
##### Example: Set to German Keyboard (WIN_DE)
```py
from keyboard_layout_win_de import KeyboardLayout
from keycode_win_de import Keycode
```
Copy the files keyboard_layout_win_de.mpy and keycode_win_de.mpy to the /lib folder on the Pico board
```
adafruit_hid/
keyboard_layout_win_de.mpy
keycode_win_de.mpy
```
## Useful links and resources
### Installation Tool
[raspberrypi5621](https://github.com/raspberrypi5621) Created a tool to convert a blank RPi Pico to a ducky.
You can find the tool [here](https://github.com/raspberrypi5621/pyducky)
### Docs
[CircuitPython](https://circuitpython.readthedocs.io/en/6.3.x/README.html)
[CircuitPython HID](https://learn.adafruit.com/circuitpython-essentials/circuitpython-hid-keyboard-and-mouse)
[Ducky Script](https://github.com/hak5darren/USB-Rubber-Ducky/wiki/Duckyscript)
### Video tutorials
[pico-ducky tutorial by **NetworkChuck**](https://www.youtube.com/watch?v=e_f9p-_JWZw)
[USB Rubber Ducky playlist by **Hak5**](https://www.youtube.com/playlist?list=PLW5y1tjAOzI0YaJslcjcI4zKI366tMBYk)
[CircuitPython tutorial on the Raspberry Pi Pico by **DroneBot Workshop**](https://www.youtube.com/watch?v=07vG-_CcDG0)


